Update:
- Streamlined user interface, see workflow in below article for new screenshots.
- All inventory created with this method will be created as Billable as a default, but the status may be managed.
- You may set the custody the inventory will be created in.

- You may now modify the quantity of a device you're adding after scanning it, instead of scanning the barcode numerous times to increment your quantity.
- You may change the manufacturer the inventory is created under so it does not have to match what is in GUDID.
- You may now export your Scans to a .CSV file.
You can now create inventory just by scanning or entering the UDI. ConnectSx will parse the UDI into its component parts and search the FDA GUDID database for the rest of the product information so you can just click “create”. It really is that simple. But don’t take my word for it, check it out below.
Creating inventory using the UDI integration to pull in product info from the GUDID Database is a great option because:
- It is faster and easier. You won't have to assemble, copy/paste, type, or otherwise enter as much information.
- It is consistent. This product information will be pulled from what you submitted to the FDA GUDID Database, helping to maintain one source of the truth for your inventory and support consistent inventory data standards.
- It is automated. Because this inventory creation method automates some of the work, it also reduces the possibility for human error.
IMPORTANT: To use this feature the Manufacturer record must already exist in the account. If your Manufacturer does not exist, create the Manufacturer in the Directory before proceeding.
If you attempt to create inventory without first creating the Manufacturer you will receive an error (see below).

Export .CSV
-
Click “New Inventory”, then select “Add Manually” or “Scan UDIs to Add”

-
You may also access this functionality from the “Import” screen by clicking “Scan UDIs”.
-2.webp?width=670&height=359&name=image%20(6)-2.webp)
-
Next, enter your UDI using your preferred method:
-
Use the camera on your device to scan the UDI
-
Use an external scanner to scan the UDI
- Click "Scan Items" to use the camera on your device to scan text of the UDI
-
Type in the UDI into the Search Field
-
-
UDI Requirements:
-
UDIs must be known to FDA GUDID database in order to be successfully imported
-
NOTE: This is a premium feature. Please contact us for details on enabling this feature for your account.
-
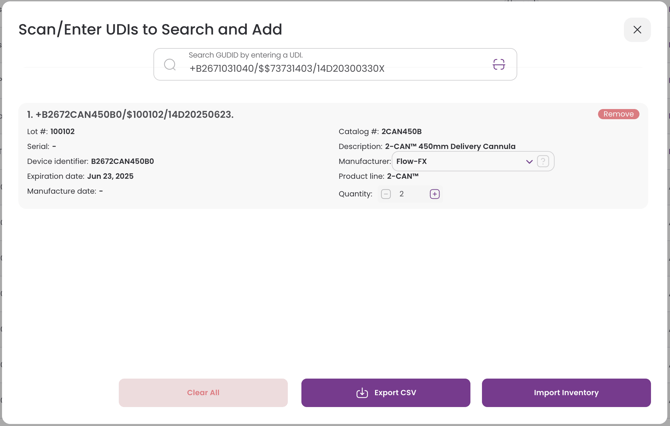
- Your scanned inventory will show below in your Scan History.
- Any invalid UDIs will be highlighted in RED for you to review, fix, or remove.
- If you scan a duplicate label, you'll receive a pop-up allowing you to either ignore the duplicate scan or increment your import quantity.
-
To increment the quantity of one of your items you may scan an additional barcode, but you may also modify the quantity of your items being created manually using the +/- buttons next to the device quantity.

- If you would like your inventory to be created under a different Manufacturer than it is listed as in the FDA GUDID database, you may change the Manufacturer in this screen.

-
Select Scan additional Items and repeat this step to add additional inventory.
-2.webp?width=670&height=359&name=image%20(9)-2.webp)
-
Once you’ve scanned all of the inventory you’d like to add, click “Import”
-3.webp?width=670&height=359&name=image%20(10)-3.webp)
- In the next screen, select the Custodian the inventory will be added to and, if required, change the billable status. Then click "Continue" and your inventory will be created.
