This premium functionality must be turned on by a ConnectSx Admin. If you are interested in using this feature, please fill out this form and a ConnectSx representative will reach out to discuss a trial.
Inventory Audits allow you to trigger inventory audit requests in ConnectSx and assign them to your users to complete. With this feature you’ll be able to:
- Assign an audit to a user
- Determine the parameters of the request (i.e. which inventory to count)
- Control whether the user can see what the expected count should be.
Create a new Audit
-
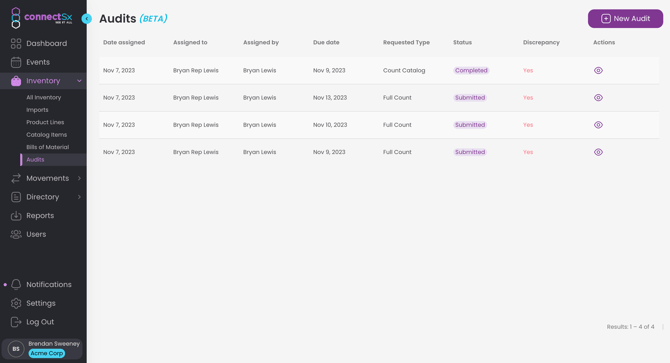
Navigate to the Inventory → Audits section of the Console as an Admin
-
Click the “New Audit” button in the upper right corner
-
Next select a user to assign the Audit to.
-
When you assign a user an audit they will be prompted to audit the inventory in their custody.
-
When you select an Admin user, they will be prompted to audit the ORG inventory.

-
-
Select a manufacturer whose inventory is to be audited
-
Select the type of count:
-
Request container or Device count by Catalog #
-
Use this option to assign counting of specific catalog #s. Devices will be counted whether they are loose or in a container. Containers will confirmed to be in the possession of the assignee but container contents will not be counted.
-
-
Request Inventory count by Container(s)
-
Use this option to assign the counting of all devices in selected containers.
-
-
Request Full Inventory Count
-
-
Click Next
-
Then select an email to send the request to
-
Modify any of the other email fields you would like, such as the Subject, Reply-to email, and message body to customize your email request
-2.webp?width=670&height=363&name=image%20(12)-2.webp)
-
Set a Due Date for the Audit count to be completed by
-3.webp?width=670&height=363&name=image%20(13)-3.webp)
-
If you would like the user to see what the counts are expected to be then check the box for “Show expected quantities to assignee”, otherwise these will be hidden
-3.webp?width=670&height=363&name=image%20(14)-3.webp)
-
Click “Create”
Enter counts on a requested Audit
To enter the results of an audit count:
-
Navigate to the Inventory → Audits section
-
Click on the requested Audit to open it up
-
You will see the inventory that was requested to be counted below and you can filter between Loose Items or Containers
-2.webp?width=670&height=363&name=image%20(15)-2.webp)
-
Note that you can export a CSV of the requested Audit to open in a program such as Excel to print and use as a count worksheet.
-2.webp?width=670&height=363&name=image%20(16)-2.webp)
-
To record the count select the row for the corresponding Catalog number and click the purple “+” button next to it
-1.webp?width=670&height=363&name=image%20(17)-1.webp)
-
Then in the quantity field that appears, enter the amount counted. Your manufacturer may or may not have allowed the expected quantities to be displayed, if so, those will be displayed along the right side. Note if an item has a “Zero” count, leave it blank.
-
When possible, please enter the Lot or UDI for the batch being counted in the field for Group ID with the column heading “ID (UDI or Lot #)”
-
Add any comments that are relevant to this Audit in the Comments box at the bottom of the page. Don’t forget you can use @Mentions to ping a particular user and draw their attention to your comment.
-
Also remember that you may upload documents to the document section on the right side of the page if you would like to store the actual count sheets you used to complete your audit, for instance.
-
After you’ve entered your counts, click “Save”
-
When all of your counts have been entered, click “Submit” to submit your results to your manufacturer.
To Record a Count for an Item not included in an Audit:
-
If you must record a count for an item that was not part of the requested Audit, click the “+ Add by Item #” button
-
Select the Catalog # from the drop down menu
-
The item will be added to the bottom of the Audit list
Interpreting the Results of an Audit
After your user has submitted the results of their audit, you as an Admin may go in and view the results.
-
Navigate to the Audits section
-
Open the Audit up
-
You will see a status at the top noting if there was a Discrepancy from what was expected
-1.webp?width=670&height=363&name=image%20(18)-1.webp)
-
You will also see the individual discrepancies and results by item below. You can scroll through and see the count by each item, what was expected, and what discrepancy remains, if any.
-
You may also click the “Export CSV” button in the upper right corner to export a .CSV of your results for further use and analysis.
-1.webp?width=670&height=363&name=image%20(19)-1.webp)
-
Then you may determine what actions to take to remedy the discrepancies in the count. Perhaps you need to:
-
Remove inventory using a Stock Adjustment
-
Add more inventory via inventory creation or transfer
-
Request another count to verify these results
-
-
Once you’ve taken action on the results and are done with this Audit, you may click “Complete” to finish the process.
-1.webp?width=670&height=363&name=image%20(20)-1.webp)