Recent Bill of Materials Updates:
- The BOM Section of the Container Detail Screen features the assigned BOM and allows it to be modified or create new BOM.
-
Added the ability to filter the device listing on the BOM page by Catalog # or Containers possible
-
Added the ability to see the minimum number of devices required for a BOM
- Bills of Materials are essentially templates or recipes for a given type of container or surgical tray.
- You may create and manage BOMs in the Bill of Materials section, then assign them to a container to apply that recipe or build out.
- Your users may use the Bill of Materials to stock the container up to the desired stock levels.
- You may use Bills of Materials just to make sure your containers stay stocked or as a way of managing custom sets.
You’ll learn all about creating BOMs, assigning them, and using them to manage your inventory in the sections below:
Create a BOM from an Existing Container
Identify Items that Don’t Belong
How many containers can be built?
You can now manage what should be in a container using Par Levels and Bills of Materials. This will help you to know when inventory levels are low or high in your trays.
Create a Bill of Materials (BOM):
-
Navigate to the Inventory→ Bills of Materials section
-
Create a BOM by clicking “New BOM”
-
Enter a name for the BOM

-
Next, search for a catalog number and click to add it to the BOM
-
You can then designate the quantity that should be included in each container assigned to this BOM, or you can delete the Catalog number by clicking the garbage can symbol. You can set a minimum quantity, a required quantity, and a maximum quantity for each catalog item.
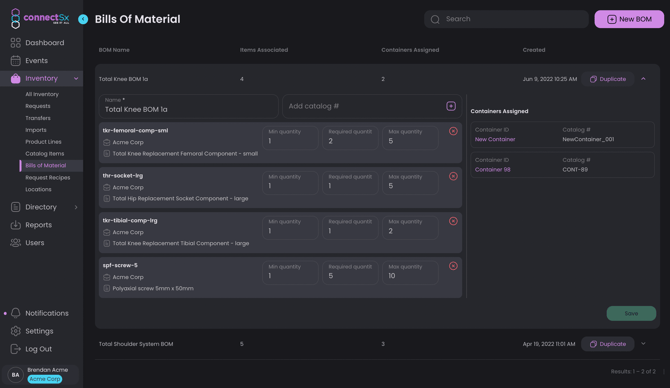
7. Save the BOM
8. The BOM Detail page provides info about the BOM including the items associated (editable) as well as the containers assigned to the BOM.
Create a BOM from an Existing Container
-
Locate the container you’d like to use as a basis for the BOM. The container must not have a BOM assigned and must be in the Organization’s custody.
-
Click “click here to create a BOM based on the device list below.”

-
Next, enter a name for the BOM
-Jun-03-2024-08-59-02-6808-PM.webp?width=670&height=361&name=image%20(12)-Jun-03-2024-08-59-02-6808-PM.webp)
-
Click “Create”
-
Once the BOM is created you can make adjustments to the inventory that is assigned to it and go ahead and assign it to other containers.
Duplicate an Existing BOM
If you’d like to, you can create a new BOM by duplicating an existing one.
-
Navigate to the Bill of Materials page
-
Locate the BOM you’d like to duplicate
-
Click on the Duplicate Button
-Jun-03-2024-08-59-13-7319-PM.webp?width=670&height=114&name=image%20(13)-Jun-03-2024-08-59-13-7319-PM.webp)
-
Type in a new name for the BOM
-
Add any additional items by selecting them from the “Select Items” field
-
Modify the Min, Required, and Max quantities
-
Click “Create” and the BOM will be duplicated.
Assign the BOM to your Container:
1. Next navigate to the inventory screen and locate the container you’d like to set par levels for
2. Enter the BOM in the container’s detail screen (one BOM can be applied to any number of containers). Click Save.
-Jun-03-2024-08-59-26-2726-PM.webp?width=670&height=416&name=image%20(14)-Jun-03-2024-08-59-26-2726-PM.webp)
3. Then you can scroll down to the Bill of Materials section and see which devices have shortages, are complete, or have excess.
4. Then add or remove devices from the container as you would normally and the Bill of Materials section will update accordingly.
Note: You may now assign a BOM to a container directly in the Bill of Materials screen. In the “Containers Assigned” section you will find the containers currently assigned to the BOM as well as a search field where you can add additional containers to this BOM (See below). You may also remove containers from a BOM in the same section.
-Jun-03-2024-08-59-36-5646-PM.webp?width=670&height=467&name=image%20(15)-Jun-03-2024-08-59-36-5646-PM.webp)
Using the Auto-Refill Feature
Note: You may not restock a container if it is part of a pending transfer or if it has an incomplete Set Checkin.
-Jun-03-2024-09-00-01-8037-PM.webp?width=670&height=416&name=image%20(16)-Jun-03-2024-09-00-01-8037-PM.webp)
-
Restocking using the Auto-Refill feature will tell the system to fill the shortages in your container either using:
-
First-in-first-out: This will select oldest items that were added to your inventory first to ensure a healthy turnover of older inventory. This is determined based on the Manufacture Date.
-
Last-in-first-out: This will select the newest items that were added to your inventory to ensure a fresh stock in the field. This is determined based on the Manufacture Date
-Jun-03-2024-09-00-13-7471-PM.webp?width=670&height=393&name=image%20(17)-Jun-03-2024-09-00-13-7471-PM.webp)
-
-
If you “Auto-Refilled” a single line item, the items the system stocked will appear at the top of the device list below. Look at the “Last Updated” column for further verification.
-
If you used the “Auto-Refill All” button, review the resulting pop-up window to see which items were stocked.
-Jun-03-2024-09-00-26-8248-PM.webp?width=670&height=416&name=image%20(18)-Jun-03-2024-09-00-26-8248-PM.webp)
-
If you would like to print a pick list, click the button at the bottom to export a .CSV of the items that were stocked. You can used this document to identify the lots or UDIs of the items the system used to stock your shortages.
-Jun-03-2024-09-00-38-0176-PM.webp?width=670&height=394&name=image%20(19)-Jun-03-2024-09-00-38-0176-PM.webp)
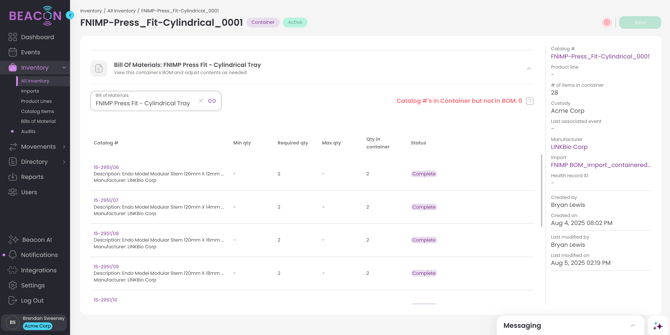
Easily identify items that don’t belong
Look in the device list on the container detail screen to easily identify items that are in the container, but do not belong based on the BOM.
Click on the “Release” button next to each item to easily remove them from the container if they aren’t supposed to be there.
-Jun-03-2024-09-01-10-0927-PM.webp?width=670&height=417&name=image%20(20)-Jun-03-2024-09-01-10-0927-PM.webp)
Use the Fix Excess Feature to fix overages
You don’t have to fix an overage my removing each item one by one. Now you can select the “Fix Excess” option next to an item in the BOM that is showing excess inventory.
-
Navigate to the container detail screen
-
Locate the item in the BOM with the overage
-
Select the “Fix Excess” option
-Jun-03-2024-09-01-40-7609-PM.webp?width=670&height=374&name=image%20(21)-Jun-03-2024-09-01-40-7609-PM.webp)
-
In the pop up, select what quantity of inventory to remove
-Jun-03-2024-09-01-53-4228-PM.webp?width=670&height=374&name=image%20(22)-Jun-03-2024-09-01-53-4228-PM.webp)
-
Click “Remove Items” and “Confirm” to process the fix.
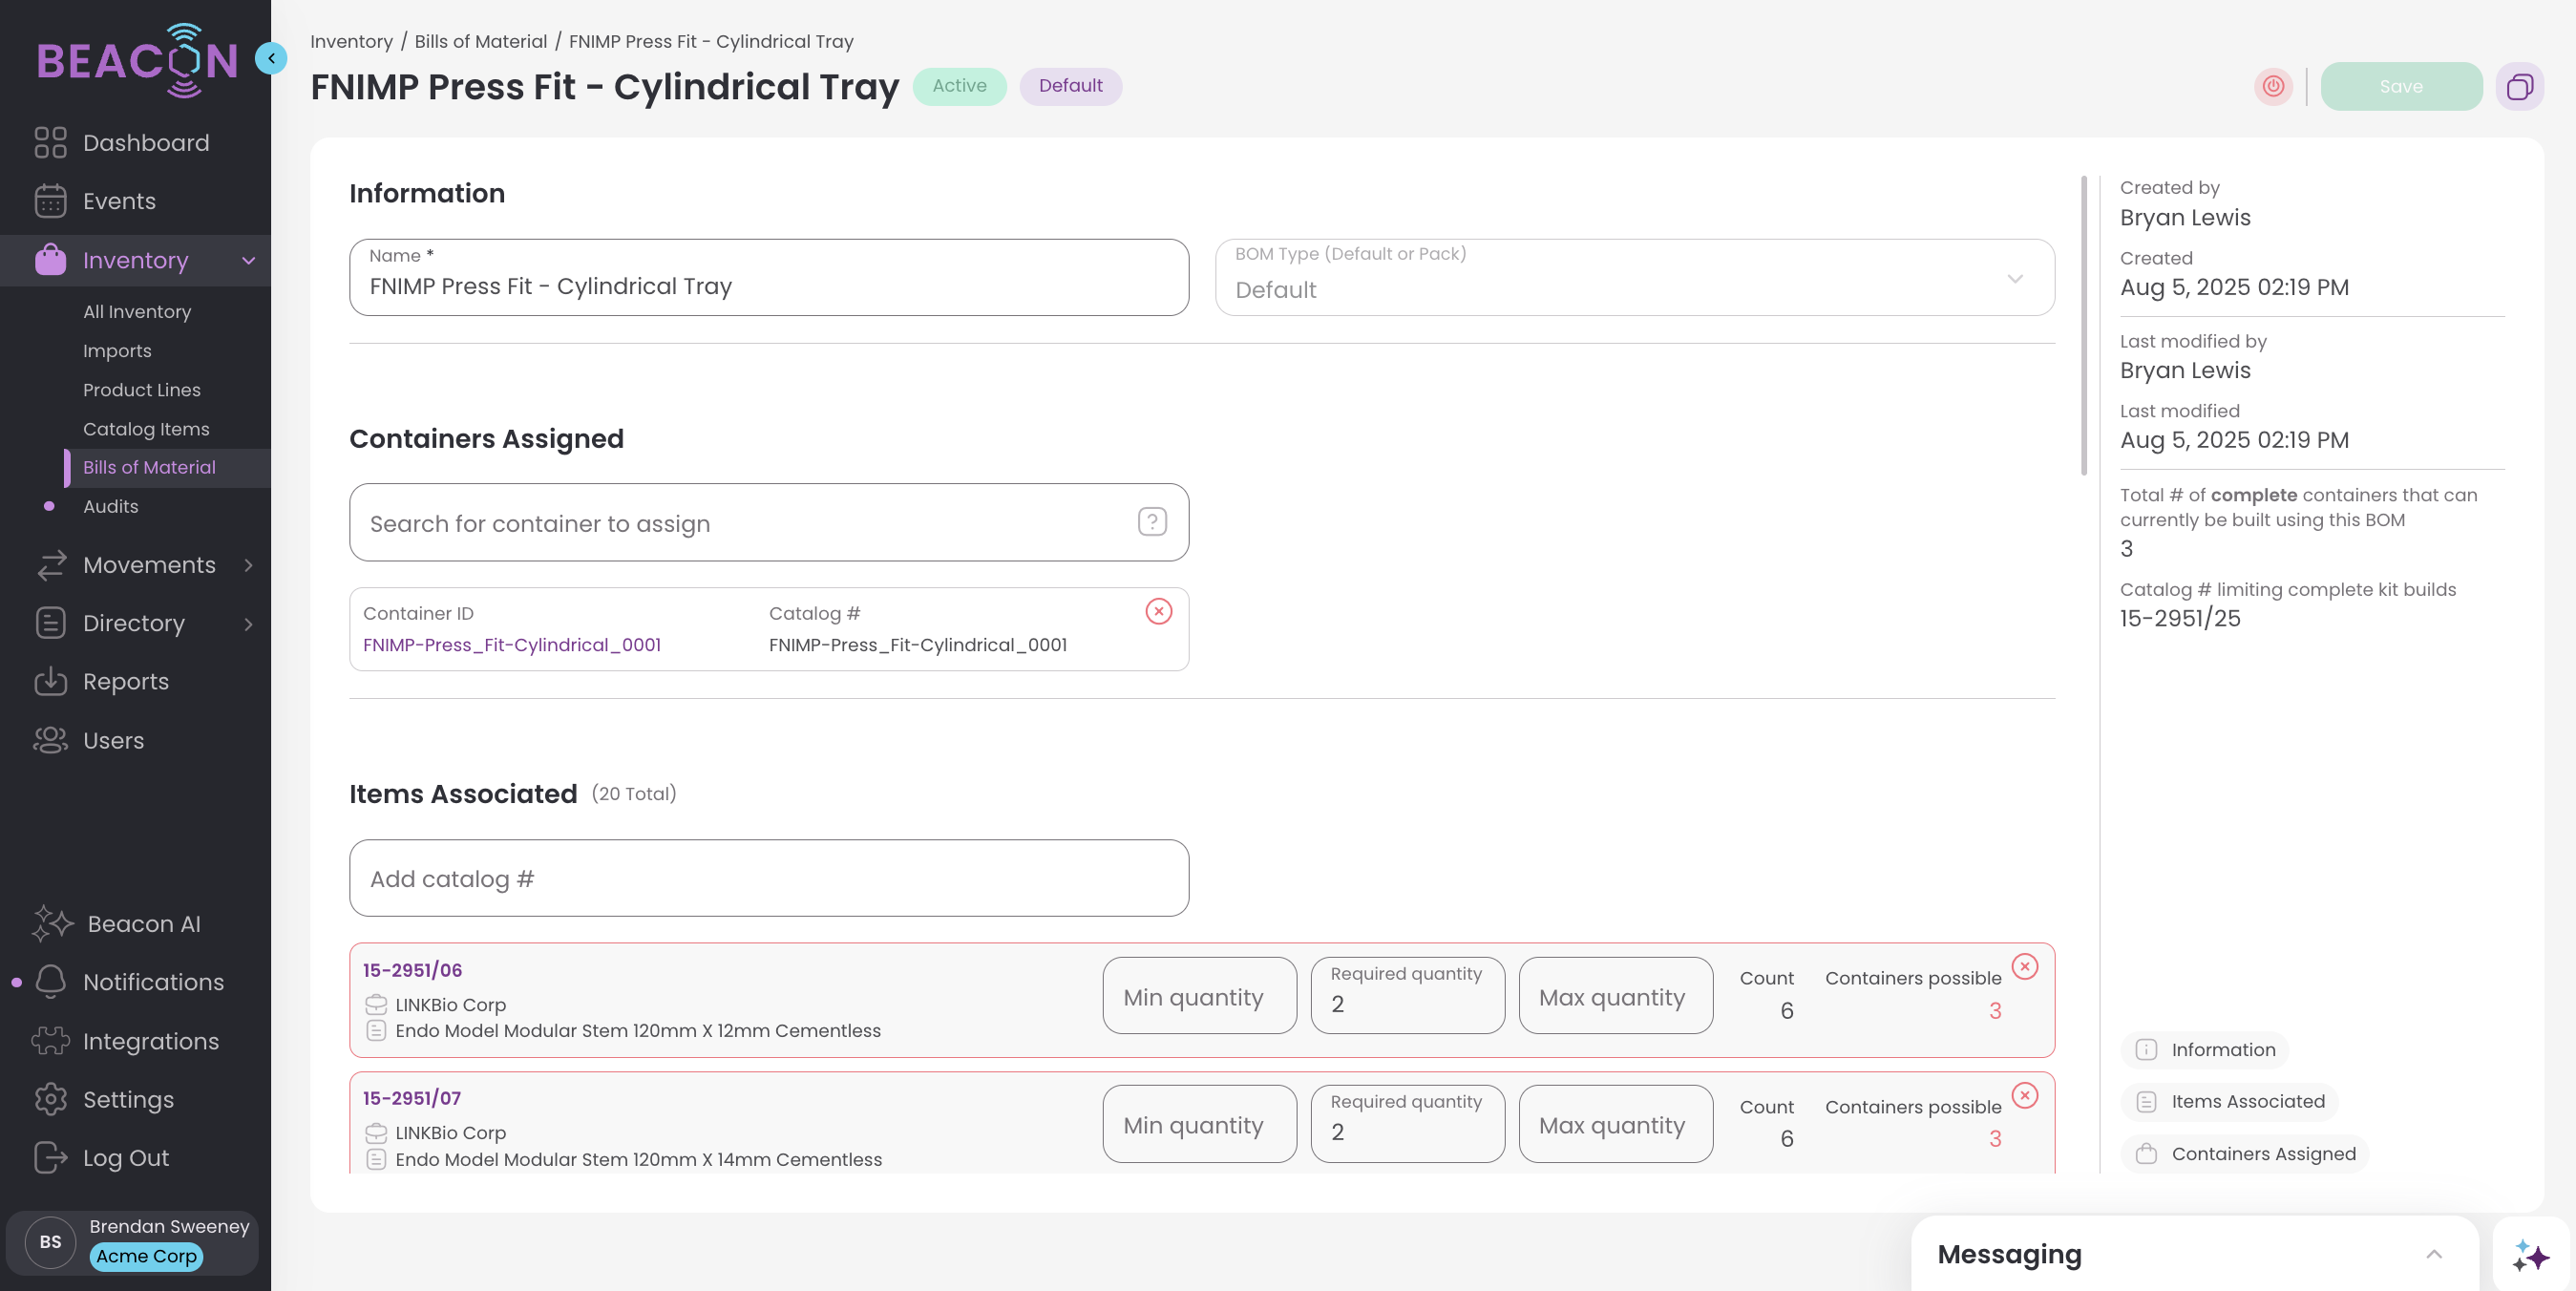
How many containers can be built?
Previously you had to do some math to figure out how many containers you could possibly create with a fully completed BOM, given your current stock. However, with the release of v4.2.0 you won’t need to lift a finger. Directly in the Bill of Materials screen you can see, by item or in total, how many fully stocked containers you could build given the current BOM and your current stock.
-Jun-03-2024-09-02-08-8373-PM.webp?width=670&height=414&name=image%20(23)-Jun-03-2024-09-02-08-8373-PM.webp)
Along the right hand side of the screen you can also see the list of catalog numbers that are preventing more of that container BOM from being built.
-4.webp?width=670&height=373&name=image%20(24)-4.webp)
Delete a BOM
To delete a BOM:
-
Navigate to the BOM page
-
Locate the BOM to delete
-
Click the garbage can icon in the upper right corner
-
Confirm the deletion
-Jun-03-2024-09-02-29-8145-PM.webp?width=670&height=361&name=image%20(25)-Jun-03-2024-09-02-29-8145-PM.webp)
Filter your Containers by BOM
Once you’ve created your BOM, you can filter containers by which BOM they have assigned to see how many and which containers are associated with that BOM.
-Jun-03-2024-09-02-39-8596-PM.webp?width=670&height=370&name=image%20(26)-Jun-03-2024-09-02-39-8596-PM.webp)