If you are in the container detail screen and are looking to create a new BOM to associate with that container, you may notice that in the Bill of Materials dropdown menu there is a “Add New” button which allows you to create a new Bill of Materials directly from the Container’s Detail Screen. However, there is a known issue you should be aware of.
Note: If you aren’t seeing this button, make sure your container is in the Org’s custody, is not associated with a pending transfer, and does not have any prohibitive statuses.
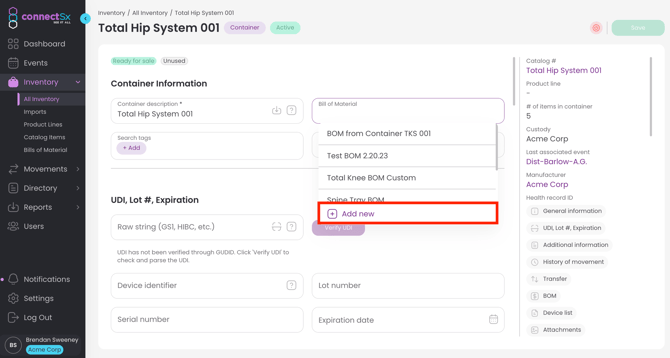
When creating a new Bill of Materials to assign to a container from the container’s detail screen, you will note that when the pop-up appears the container itself has been added to the Bill of Materials.
This is a known issue that the ConnectSx team is working to resolve. A Container’s catalog number must be unique, and as such should not be able to be added to a Bill of Materials. Additionally, by nature a BOM is meant to determine what goes inside of a container and containers are not allowed to be nested within each other in ConnectSx at this time.

So what do I do? (you may be asking)
Well you may still create the BOM this way, but you’ll need to go to the BOM afterwards in the Inventory → Bill of Materials section and remove the container from the BOM.
-
First, Give the Bill of Materials a Name
-
Next, finish adding any additional items to the BOM that you would like to add by selecting the product line and catalog number, then adjusting the desired quantity.
-4.webp?width=670&height=358&name=image%20(5)-4.webp)
-
Click “Create” when you’ve added the additional items you’d like to add.
-
Navigate to the Inventory → Bill of Materials page and open up the BOM you just created.
-
Next, click on the red X next to the Container catalog number in the item list to remove the Container catalog from the BOM.
-4.webp?width=670&height=358&name=image%20(6)-4.webp)
-
Click Save.