Last updated: May 2024
“I Feel like I’m not seeing all of my data, why are there only 500 rows?”
Make sure you’re exporting the right table.
Looker is a powerful visualization tool which allows us to deliver powerful analytics and insights directly through the Console to you, but there are limitations on how many rows can be displayed on screen due to the amount and complexity of the data. That is why it is important to understand what you’re looking at, what the constraints are, and what data you are selecting for export.
“I Feel like I’m not seeing all of my data, why are there only 500 rows?”
- There is sometimes too much complex data for the system to display visually on-screen, so we are only able to display a selection in the on-screen view.
- Some of the Looker tables in ConnectSx have row caps between 500-5,000, so if you have a large data set it is possible that not all data is being displayed on-screen.
- You can always export the entire data set by applying the correct settings, which we outline below...
Make sure you’re exporting the right table.
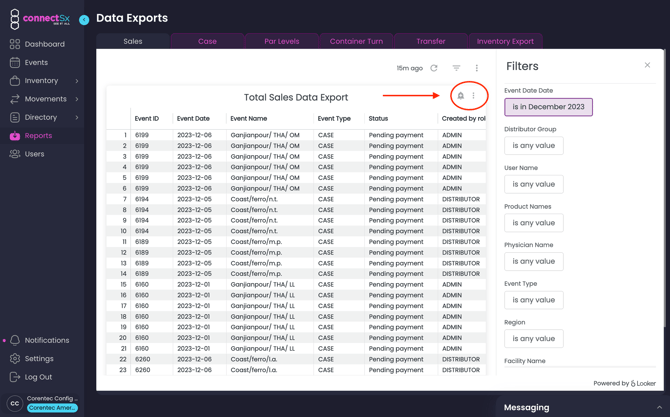
In each Looker report there is a Looker Window that houses all of the widget cards that display the data inside. This outer looker window has a Kabob menu that allows you to export data, but that data will be capped at 500 rows and does not allow for Advanced Data Settings. So the first step is to make sure you’re exporting the right table.
As shown below, make sure you are clicking the menu for the actual table you would like to export. You may have to hover your cursor over the table to make it appear.
Use Advanced Data Options
If your report has a row cap and you’d like to export the full data set, make sure to use Advanced Data Options for your export.
-
Click on the “Kabob” menu represented by 3 vertical dots in the table you would like to export (See above).
-
Select “Download Data”

-
Next, select the file type you would like to export
.webp?width=670&height=375&name=image%20(29).webp)
-
Next, expand the section for “Advanced Data Options”
-
Then under “Number of Rows to Include” select “All Results” to ensure that your export includes all data.
.webp?width=670&height=375&name=image%20(30).webp)