Last updated: May 2024
In this portion of the case workflow the case has already been performed, sales have been recorded, the case was submitted for billing, and the sales order has been shared. All that's left is to Bill for the Case.
The next step is to retrieve the Purchase Order number and enter it into the case to change its status from “Pending PO” to “Pending Payment”.
Once the case has been completed the invoice may be generated to send to the provider and the case can be marked as “Invoice Paid” and/or “Commission Paid” once those payments have been transacted.
Enter the PO in the Event in Beacon Mobile
Enter the PO in the Event in Beacon
How to keep track of Events with Pending PO#'s
Next Step: Getting and Sharing the Invoice
Enter the PO in the Event in Beacon Mobile
To complete the Case workflow, retrieve the PO number from the provider and enter it in the last step - “Add Purchase Order”:
-
Open the Event Detail screen for the case by clicking on the Event Name in the Event List view.
-
In the Event Detail Screen click on the “Add Purchase Order” option by .
-
In the pop-up window, if all devices used in the Event are going to be on the same Purchase Order enter the PO number in the field named “All Manufacturers”
-
If devices from multiple manufacturers were used and separate POs are required, enter the PO numbers in the fields designated for each manufacturer (located below “All Manufacturers”).
-
Click "Complete" - The Event will now be considered Complete and enter a "Pending Payment" status.
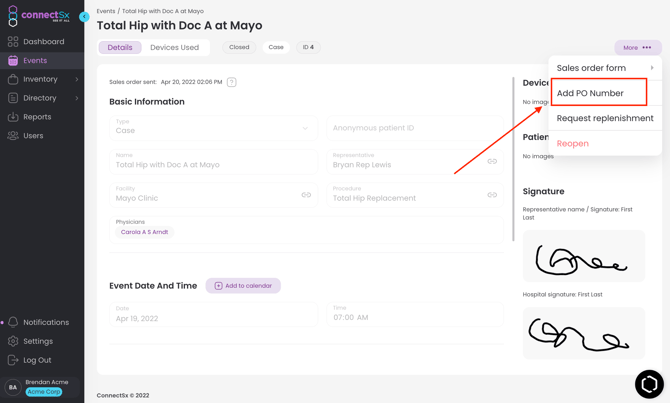
Add the PO to the Event in Beacon
If, for some reason, the sales user is not able to enter the Purchase Order number into Beacon Mobile, users can enter the number and Complete the case in the Event Detail Screen of the Console.
-
Open the Event Detail screen for the case by clicking on the Event Name in the Event List view.
-
In the Event Detail Screen click on the “Add Purchase Order” button in the upper right corner.
-
In the pop-up window, if all devices used in the Event are going to be on the same Purchase Order enter the PO number in the field named “All Manufacturers”
-
If devices from multiple manufacturers were used and separate POs are required, enter the PO numbers in the fields designated for each manufacturer (located below “All Manufacturers”).
-
Click "Complete" - The Event will now be considered Complete and enter a "Pending Payment" status.
How to Keep Track of Cases with Pending PO #'s
Additionally, we recognize that it can be difficult to track what stage each case is in - which have been paid, which are outstanding - so we created a section of the Dashboard that helps you to track which cases have outstanding purchase orders that still need to be tracked down and entered into the case.

In the Events Tab of the dashboard look for the area marked “Pending PO#’s”. Here you will see the total of events lacking PO numbers and you can page through the list, while also viewing the total value of that Purchase Order and the event’s date.
.webp?width=600&height=608&name=image%20(5).webp)