After you've set up your users, it's time to talk about some settings and controls that will help you optimize your team's performance.
-
Authorize a User has completed training to unlock their account (Required for user set up). Before your user can start their ConnectSx journey, they need to complete training to unlock their account. It's like a key to the cool ConnectSx clubhouse.
-
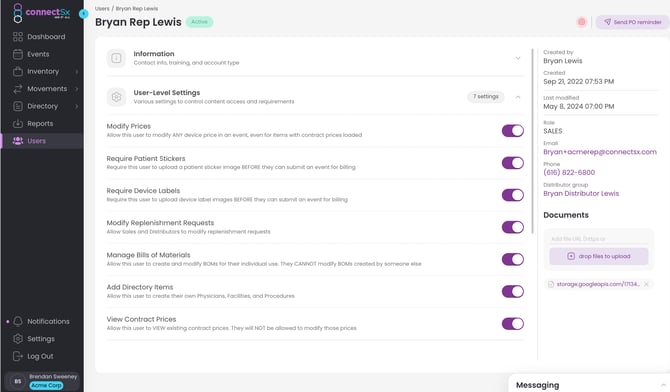
Modify Prices: Allow this user to modify any price in an event, even for items with contract prices loaded
-
Require Patient Stickers: Require users to upload images of patient stickers to an Event
-
Require Device Labels: Require users to upload images of device labels to an Event
- Create Shipping Labels: Allow this user to use the organization's shipping account to generate shipping labels to ship transfers
-
Modify Replenishment Requests: Allow Sales and Distributors to modify replenishment requests
-
Manage Bills of Materials: Allow users to create and modify BOMs they have created
-
Add Directory Items: Allow a user to create new directory records
-
View Contract Prices: Allow a user to view existing contract prices for a facility in the Directory
- Quick Transfers: Allow this user to transfer and use inventory in the possession of specified users.
-
Custodian Only Users: Next, we have Custodian Only Users. These users have access to inventory items, but not to the full range of features available in ConnectSx. Think of them as the "lite" version of your team.
-
Authorizing Directory Access: (Required for user set up). We know security is a big deal, so we require you to authorize directory access when setting up a user. It's like checking their ID at the door to make sure they're supposed to be there.
-
Set Sales Targets for a User: Last but not least, Set Sales Targets for a User. This setting allows you to set sales goals for individual team members. It's like giving them a carrot to chase after - and who doesn't like a good carrot?
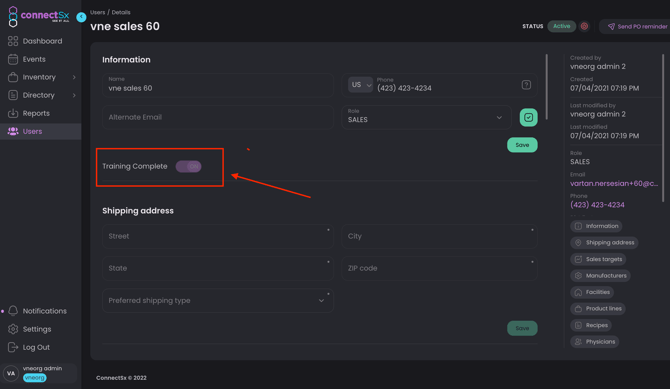
1. Authorize a User has completed training to unlock their account
When you’re adding new users it’s critical that you know they are competent with your products before you let them loose scheduling cases. We built a control which keeps a new user account “Locked” until you check off that they are trained.
Note: All new user accounts (other than Admin) are automatically locked until this is checked off. This can only be checked off once and then the user will be set to Active in perpetuity. To restrict a user after this point you must deactivate the user (you may reactivate them at any time).
Another way to restrict a user is to revoke their directory access assignments to prevent a user from doing business in the system with a certain Facility, Product, or Physician.
-
Navigate to the Users Screen in Beacon as an Admin
-
Select the User
-
Click the toggle that says “Training Complete”
-
Hit Save.
2. Modify Prices
This setting allows you to allow (or prevent) this user to modify any price in an event, even for items with contract prices loaded.
ON = Allows User to make price changes in an Event
3. Require Patient Stickers
This setting allows you to require users to upload images of patient stickers to the patient stickers section in an Event, before the Event can be submitted for billing.
ON = Requires Patient Stickers
4. Require Device Labels
This setting allows you to require users to upload images of device labels to the device labels section in an Event before the Event can be submitted for billing.
ON = Requires Device Labels
5.Create Shipping Labels
This setting allows users to generate shipping labels for transfers.
ON= Allow users to generate shipping labels
OFF = Do not enable this feature
6. Modify Replenishment Requests: Allow Sales and Distributors to modify replenishment requests
This setting controls whether users may remove items or add items to a replenishment request.
ON = Allow users to modify replenishment requets
7. Manage Bills of Materials
This setting allows you to allow (or prevent) users to create and modify BOMs they have created. They will not be able to modify BOMs created by someone else.
ON = Allow Bills of Materials
8. Add Directory Items
This setting allows a user to create new items in the directory (Facilities, Physicians, Procedures).
ON = Allow Add Directory Items
9. View Contract Prices
This setting allows this user to view existing contract prices for a given Facility in the Directory. They will NOT be allowed to modify those prices.
ON = Allows Viewing of Contract Prices
10. Quick Transfers
Setting up quick transfers enables this user to initiate transfers TO THEMSELVES from select custodies. Transfers will be accepted automatically. This is meant to enable the use of forward stocking locations or prevent emergency inventory shortages.
Select the custodians this user will be allowed to quick transfer with.
ON= Allow Quick Transfers
OFF = Do not allow Quick Transfers
11. Custodian Only Users
Sometimes you may have a custodial location that is not an active user, or maybe you have a user who cannot or will not use ConnectSx. In these situations you can use the “Custodian Only” setting for that user.
The custodian only setting will allow you to use that user as an entity, transferring inventory to them, but they will never log in or take any action on their own.
To set this up for a user:
-
Navigate to the User’s detail screen
-
Click the “Custodian Only” switch
-
Click Save
-4.webp?width=670&height=362&name=image%20(18)-4.webp)
12. Authorizing Directory Access
You probably have a lot of critical info stored in your Directory and not everybody needs access to everything. When a user is created the Admin must assign which directory records a user should interact with in ConnectSx. This serves to:
-
Make it easier when users are selecting from the Directory in an Event.
-
Allow you to control which users have access to certain Products, Facilities, Physicians, and Manufacturers. This of this as “authorizing” a user to do business with those entities.
-4.webp?width=670&height=388&name=image%20(19)-4.webp)
-
Navigate to the Users tab.
-
Select your Sales or Distributor user.
-
Scroll down the page until you see the “Assign…” fields.
-
Here you’ll see all of the Manufacturers, Facilities, Physicians, and Product Lines that are already associated with the user. If you’d like to revoke any existing access, click the Trash symbol next to that entry. Then click save.
-
Note: When inventory is transferred to a user that manufacturer is automatically assigned to their Account. This Manufacturer cannot be removed from the account unless all active inventory is transferred out of the user’s custody.
-
-
To assign a new authorization, search for the record in the relevant search bar.
-
Click on the record so it appears in the list. Then click “Save” at the top of the window.
13. Set Sales Targets for a User
Admin users may set Sales Targets by quarter for Sales and Distributor Users in the User detail screens. The user’s sales will track against these targets in the User detail screen and also roll up cumulatively with other users' sales targets in the Dashboard Widget.
-
In the User screen scroll down to the Sales Targets and Performance section.
-
Click “Edit”
-
Enter the targets for this sales user (in Sales $) per quarter. Then click “Save”
-
You may now return to this screen to see how this Sales User is doing vs. their quarterly sales goals.
-4.webp?width=670&height=147&name=image%20(20)-4.webp)