The users section is a critical part of the console where you can create users, deactivate users, manage user information, modify commissions, set sales targets, and create directory assignments.
All of these options may be accessed by navigating to the Users section of the navigation in Beacon as an Operations or Admin user.
Additional Contact for the User
To create a new user you may invite the new user or add them before giving them access:
- Navigate to the Users section of Beacon as an Operations user or Admin
-
Click on the “Add Users” button in the upper right corner of the Users page
-
Select whether you want to invite a user or add a user by changing the tab in the header.
-
Inviting a user will send an email to that user with a link for them to claim their account.
-
Adding a user allows you to create the user without them having to claim an invitation. They can claim their account at a later date by accessing console.connectsx.com and clicking Forgot Password.

-
-
Fill in the email address of the user you’d like to invite in the email field
-
Select their intended role from the drop down menu next to the email address. You may choose from Sales, Distributor, Regional Manager, or Manufacturer.
-
Click on the “Send” button to send the invite or “Add User” to create the user.
-
Click “Pending” to review your currently pending email invites.

-
Click on the red X to revoke an invitation or the paper airplane to resend it.

Deactivate a User
-
Navigate to a User and click on their name to open the User record.
-
Click the deactivate button in the upper right hand corner to deactivate the user (shown below).

-
Click “Reactivate” if you want the user to be reinstated.


Account Details:
-
Click on that user to view the details of their account.
-
In this screen you can update:
-
The contact information
-
Training and Custodian status
-
Shipping Address
-
Add additional contacts
-
View inventory in their custody
-
View recent activity for that user
-
Enter/Modify Commission
-
Enter Sales Targets
-
Make Directory Assignments
-
Enter the User’s Contact Information
-
In each user’s detail screen you can enter their Shipping Address and Phone Number which will appear on Transfers and Inventory Requests.
-
You may add an alternate email address for a user in the User Information section at the top of the User detail screen. Make sure to save!
-
You may assign Regions to sales and distributor users. To learn more about regions check out this article.

Add Additional Contacts for a User
You may also add additional contacts for a user if, for instance, they have multiple offices or if they have an office assistant.
-
To do this click “+Additional Contact” in the Additional Contacts section.
-
Enter the contact’s information
-
Save the Additional Contacts section.

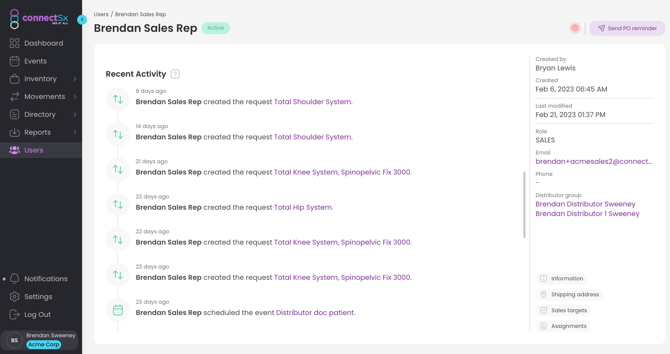
Review Recent Activity for that User
This section displays recent activity that user has taken and provides links to the relevant data.
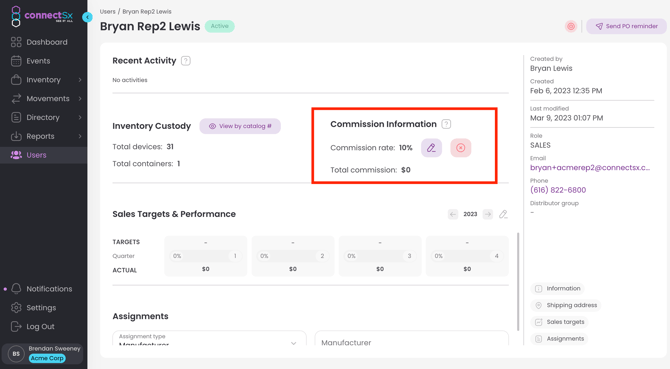
Entering a Commission Rate for a User
-
Click on the user you’d like to enter a commission for (must be a sales user).
-
Enter the commission rate for that user.
-
Click Save.
The commissions will then be able to be pulled using the report “Sales by Representative”. The commission will be run off of the sales recorded on the sales order for an event.
Store documents for a user
You can also upload documents to a user’s account, such as a contract or their certifications.
-
In the user detail screen, scroll to the document section
-
Then either drag the file to that region of the screen or search for the file on your computer by clicking on the button
-
Make sure to hit save

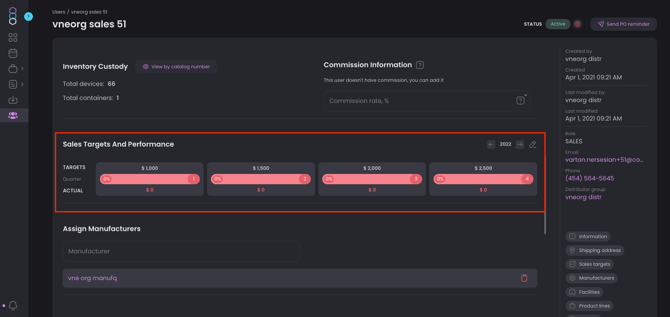
How to Set Sales Targets for a User
-
In the User screen scroll down to the Sales Targets and Performance section.
-
Click “Edit”
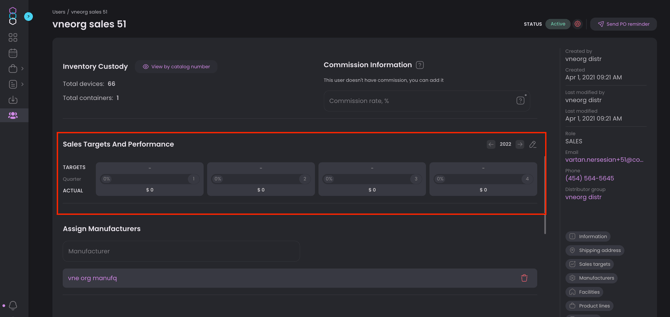
3. Enter the targets for this sales user (in Sales $) per quarter. Then click “Save”
4. You may now return to this screen to see how this Sales User is doing vs. their quarterly sales goals.
You also will need to assign directory records for your Sales and Distributor Users. This is a critical step that must be completed before users may create Events and log their sales.
And don’t forget to assign your Procedures, Products, and Facilities to your Physicians!
Make sure to check out our User Setup Checklist to make sure your users are good to go!