December 2025 Update: We've updated the sales order selection screen to centralize your options and make it easier to select! 
The next step after submitting the case for billing is to generate the sales order so it can be sent to the Facility and kick off the billing process.
Send the Sales Order as an Email Attachment
Downloading and Sharing in vTrakr
How do I know if the Sales Order was Sent?
Next step: Add the PO to the case
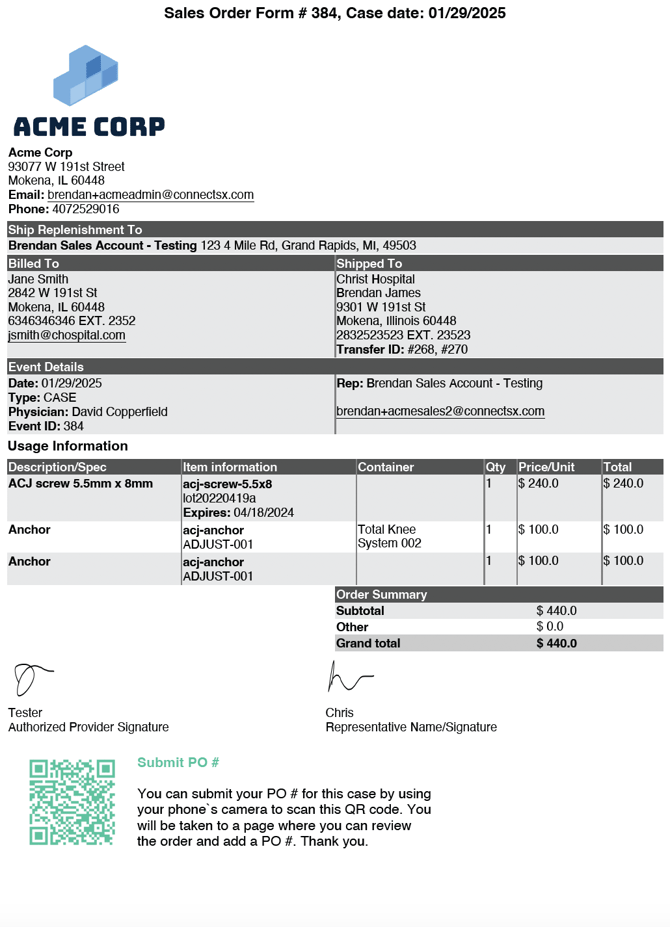
The Sales Order form has been updated for a clearer presentation, the new format is displayed below.
Generate the Sales Order
- Navigate to the Event in question and open its detail screen by clicking on the Event Name in the Event List view.
- Click on the "More..." menu in the upper right corner and select the option for Sales Order.

- To download the Sales Order select one of the PDF options in the list
- Download PDF
- You may select if you want prices displayed using the checkbox.
- You may select if you want replenishment address displayed using the second checkbox.
- Click the "Download PDF" Button.
- Download PDF
- The PDF will download to your device.
- You may now share this sales order PDF with the facility or any other relevant recipients using any method at your disposal.
Send the Sales Order as an Email Attachment from ConnectSx
The best method for sharing the sales order is to send it directly from ConnectSx as soon as the case is submitted for billing.
- Navigate to the event that was closed and access its detail screen by clicking on the Event Name in the Event List view.
- Click on the "More..." button in the upper right corner to expose the drop down menu and select the option for Sales Order.
- Select "Send as email attachment" button from the available options

- Make any necessary adjustments to the email in the pop up window including:
- The subject
- the recipient (Select from dropdown or type manually)
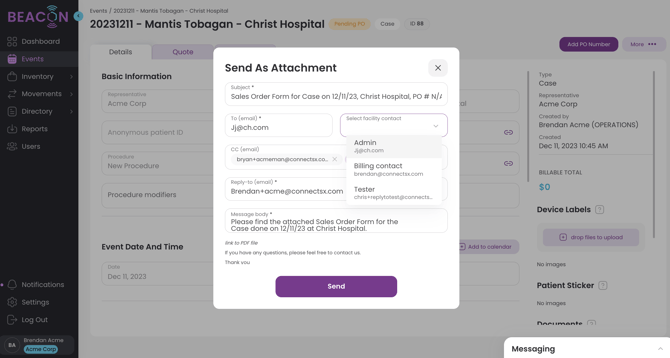
- CC recipients
- Reply-to email address
- Message body

- Once the email look good, click "Send"
- The email sent includes:
- an attachment to the sales order
- a link to the sales order
- a link to add the purchase order to the case.
Sharing the Sales Order in Beacon Mobile
You may email the sales order as an attachment from Beacon Mobile as well
- Navigate to the case in question and access its detail screen by clicking on the Event Name in the Event List view
- Click on the vertical ellipse or "Kabob" button in the lower right corner.

- Click on the "Sales Order Form" button to access the available options

- To download the sales order select one of the PDF options:
- Download PDF
- Download PDF (no prices)
- Download PDF (no replenishment address)

- The PDF will download to your device.
- To send the sales order from ConnectSx select "Send as email attachment"
- Make any necessary adjustments to the email in the Pop-up screen including:
- The subject
- the recipient (Select from dropdown or type manually)
- CC recipients
- Reply-to email address
- Message body

- Click "Send"
- The email sent includes:
- an attachment to the sales order
- a link to the sales order
- a link to add the purchase order to the case.
How do I know if the sales order has already been sent?
Wouldn't it be nice to have a way to confirm that a sales order has been shared?
Well, we added a timestamp (shown below) of the most recent time the Sales Order has been shared.
This will only generate when the sales order is SENT AS AN EMAIL ATTACHMENT from inside ConnectSx.
If the sales order is downloaded and sent using personal email or some other method ConnectSx will be unable to track this activity.

The next step after sharing the sales order is to add the PO to the case.