-
What are tags?
1. What are Tags?
One of the most flexible and versatile tools in ConnectSx is one you’re probably already familiar with - Tags. Essentially Tags are user-defined search terms. Include specific information that is not included elsewhere or makes sense to break out. These are completely subjective to be used at your discretion to improve the ease of searching for a device.
Tags could be descriptors for your inventory such as a length measurement (“44m”), or it could be the inventory type (“implant”) - whatever is useful to you. Is there a field in ConnectSx that’s not searchable yet? Then enter it as a tag - and boom - it’s searchable!
You could also use tags to add temporary statuses or notes for an item that could be searched and then removed later. Maybe a rep is storing their inventory in different locations and they want to note that some inventory is in “Basement storage”. Basement storage is not a location or custodian, but this tag will allow the user to keep track of what they’re storing in their basement.
2. What Tags should you create?
Status Tags
Status tags are meant to signify a temporary quality of a piece of inventory that is not already tracked in ConnectSx. For instance, maybe a device is being reworked, so you could add a tag for “Rework” to that inventory allowing you to search for “Rework” and export a report with all of your reworked inventory.
Process Tags
Process tags delineate what stage of a process a device is in that is not already tracked in ConnectSx. For instance, if a surgical tray is being inspected upon being returned to the home office, you could add a tag for “Received - Pending Inspection”. This would allow you to look at all of the inventory that is in a given workflow by stage.
Organization Tags
Similar to tags mentioned already in this article, organization tags represent a characteristic of your inventory or a way of grouping them to further organize and segment your inventory. For instance, you may have similar inventory items of different materials and you want to segment them with tags like “Stainless Steel” and “Titanium”.
Location Tags
Note: the use of tags to manage location is now obsolete, please refer to our articles on using the Location functionality.
If you’d like to record where an item is being stored between different warehouses or hospitals, you could enter tags for the given location. For example, I could say “Christ Hospital” and “Trunk Stock” to further organize the inventory in my custody by storage location.
Anything Else
Tags are a very versatile tool in ConnectSx and you can enter a tag for anything you can imagine. However, make sure to be consistent and communicate within your organization to ensure Tags are understood and used in uniform across your users.
3. How to use Tags in ConnectSx?
Tags are easiest to add to a large number of devices during an inventory import. After inventory is imported, the tags will need to be added to each item individually.
Before you add your tags, keep in mind how you may want to standardize your tags so they can be more useful. If you add a multitude of different tags, with different spellings, it makes them less valuable because users may not remember which tags to search and filter by.
To add tags during your inventory import follow these instructions in your import file:
Your tags should all be included in one column, one cell per row, with each tag being separated by the “|” bar symbol. Please see the example below:
For example: 6.5mm|100mm|Partially Threaded|Cannulated|Titanium|Screw
-
Width: (6.5mm)
-
Length: (100mm)
-
Threading: (Partially Threaded)
-
Cannulation: (Cannulated)
-
Material: (Titanium)
-
Type: (Screw)
Then all of those tags would be searchable and would return that device in the search results. Tags could also be used to assign a temporary note or status to an item, such as if an item was being reworked. I might create a tag that reads “Rework 7-20-19” to reflect its status and when it is expected to be returned. Then I would delete the tag when the device is ready to be considered active inventory again. Another instance would be if I added a tag called “HOLD” for items that were under Quality Control Hold or were being inspected.
4. To add Tags to individual items in the detail screen:
-
Navigate to the inventory screen
-
Filter and search to locate the device or container you’d like to add a tag to
-
Click on it to access its detail screen
-
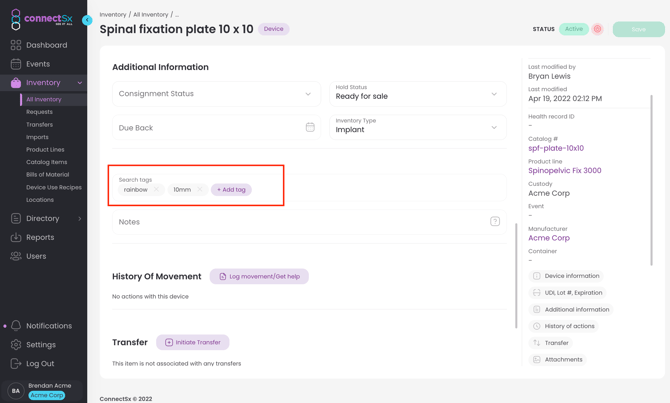
Scroll down to the “tags” field
-
Type in your tag or select from the drop down of existing tags
-
Hit “enter” on your keyboard
-Jun-04-2024-07-58-31-4023-PM.webp?width=670&height=360&name=image%20(5)-Jun-04-2024-07-58-31-4023-PM.webp)
-
Then click “save” at the top of the screen when you’re done.
-
Then the tags will be added!
5. To add tags while you’re transferring
-
Select the inventory that needs to be transferred
-
Click “Next” to get to the Preview step of the workflow
-
Scroll down on the right hand side to reach the Tags field.
-Jun-04-2024-07-59-28-8461-PM.webp?width=670&height=360&name=image%20(6)-Jun-04-2024-07-59-28-8461-PM.webp)
-
Type in the field to create your transfer or select from the drop down of pre-existing tags
-
Hit “enter” on your keyboard
-
Click “Create” to create your transfer and the tags will be appied.
6. To Search using Tags:
-
Navigate to the inventory page
-
Enter your tag into the search bar in the filters column
-Jun-04-2024-08-00-36-3389-PM.webp?width=670&height=404&name=image%20(7)-Jun-04-2024-08-00-36-3389-PM.webp)
-
Then wait for the inventory to filter and you’ll see your search results