If this is the first time that you are using ConnectSx, if you have a new physical inventory or cycle counts, or if you have new inventory to input into the system, you can upload a spreadsheet (.CSV) using the inventory import function.
If you are importing inventory using the ConnectSx inventory import template, your columns and field headings can now be mapped automatically with the check of a box! Be sure to review your mappings before you import, just to make sure everything looks right.
Inventory imports may be undone ONLY within 48 hrs of the import timestamp and if NO inventory has been modified. We recommend building a review process for your imports to make sure that all data is correct within this time period before inventory is allowed to be modified and used.
Modified means any action including, transfers, detail changes, marking as used, adding to a container.
To undo an inventory import check out this article.
Creating your Inventory Load File
Reviewing the Inventory and Deleting Imports
A Note on Large Imports
The system will warn you if you attempt to import more than 5,000 devices per import or 999 of a particular catalog number as these may cause long wait times.
Additionally, consider this warning given the import you are doing, does this seem right? Should you double check your data or your column/field mappings to make sure the import is configured correctly?
Templates and Auto-Mapping
Download and utilize these templates to assist you in your inventory imports and assembling your other data for onboarding and account setup.
*** Blank Inventory Import Template *** (Use this template for Auto-Mapping functionality)
-
Use this template to assemble your inventory data for import
-
When importing with this template check the box for Auto-Mapping to apply the system’s auto-map feature.

Additional Templates:
ConnectSx Onboarding Data Template - All Data with Instructions and Notes
-
This template can assist you in assembling your inventory data as well as the other data to set up your ConnectSx Account, including instructions.
ConnectSx Onboarding Data Template - All Data - Blank
-
This template can assist you in assembling your inventory data as well as the other data to set up your ConnectSx Account, without instructions.
Creating Your Inventory Load File
Note: If a catalog number in your import has not been created already in your account, it will be created automatically in the Catalog during import and will adopt the description imported with it.
If an item in the catalog DOES NOT have a description entered, it will inherit the description of the next imported inventory item sharing that catalog number. If it already has a description in the catalog, nothing will be changed.
Note: Ask your account manager about our integration services or to use our API to link ConnectSx with your ERP or other inventory management system.
-
First you’ll need to navigate to the Inventory section and click “Imports”. Next, click on the “New Import” button.
-
Then you’ll need your inventory spreadsheet with column field headings, saved as a .csv file. To read more about preparing your import file, check out this article. The columns that can be included in the inventory import are listed here (more detail later in this section). We’ve marked the required fields with an *.
-
*Item Number (aka Catalog Number, Reference Number)
-
*Description
-
*Product Line
-
*Quantity
-
Custody
-
UDI (Note: If entering UDI, your lot # must match what is part of the UDI. The system will parse the UDI and populate the lot number automatically. If you have a different lot number than is part of your UDI, reach out to us to discuss options for loading that data). DO NOT LOAD INFORMATION THAT IS CONTAINER IN YOUR UDI. IF THE INFORMATION LOADED IS DIFFERENT THAN THE UDI, THE INFO IN THE UDI WILL WIN OUT. THE UDI IS THE SOURCE OF TRUTH.
-
Tags
-
Container ID (Catalog Number) - Container ID in the import references the catalog number of the container (used to identify unique containers), and as a reminder must be unique from the catalog numbers of other Containers in your inventory.
- Creating your containers manually in the system prior to doing an inventory import will give you more flexibility over the naming of the container and the entry of its data. We suggest this method so that the Container can be assigned to the correct product line and be given a full description.
-
-
-
Billable
-
Price
-
Lot Number (Note: If entering UDI, your lot # must match what is part of the UDI. The system will parse the UDI and populate the lot number automatically. If you have a different lot number than is part of your UDI, reach out to us to discuss options for loading that data). DO NOT LOAD INFORMATION THAT IS CONTAINED IN YOUR UDI. IF THE INFORMATION LOADED IS DIFFERENT THAN THE UDI, THE INFO IN THE UDI WILL WIN OUT. THE UDI IS THE SOURCE OF TRUTH.
-
Barcode
-
Serial Number (Note: If entering UDI, your serial # must match what is part of the UDI. The system will parse the UDI and populate the serial number automatically. If you have a different serial number than is part of your UDI, reach out to us to discuss options for loading that data). DO NOT LOAD INFORMATION THAT IS CONTAINED IN YOUR UDI. IF THE INFORMATION LOADED IS DIFFERENT THAN THE UDI, THE INFO IN THE UDI WILL WIN OUT. THE UDI IS THE SOURCE OF TRUTH.
-
Expiration Date (Note: If entering UDI, your lot # must match what is part of the UDI. The system will parse the UDI and populate the lot number automatically. If you have a different lot number than is part of your UDI, reach out to us to discuss options for loading that data). DO NOT LOAD INFORMATION THAT IS CONTAINED IN YOUR UDI. IF THE INFORMATION LOADED IS DIFFERENT THAN THE UDI, THE INFO IN THE UDI WILL WIN OUT. THE UDI IS THE SOURCE OF TRUTH.
-
Cost of Goods
-
LOCATION: Just make sure the location in your import matches locations in the system to a “T”, or it will create new locations for those that differ from the locations existing in your account.
-
INVENTORY TYPE (Biologic, Implant, Instrument, or Other)
-
Manufacture Date
- Location
-
3. Click on “Choose Your CSV File” to browse for your spreadsheet. Then select the relevant manufacturer from the drop down menu.

4. If desired, enter a name for the import (See above). This name will be used to trace an item to the import that created it.
5. Select a Hold Status (i.e. Inspection, Quarantine, Ready for Sale, Receiving, or Rejected/Damaged) to apply to the whole import. Note: Item hold statuses will have to be updated individually or updated at the container level to affect all items contained within.
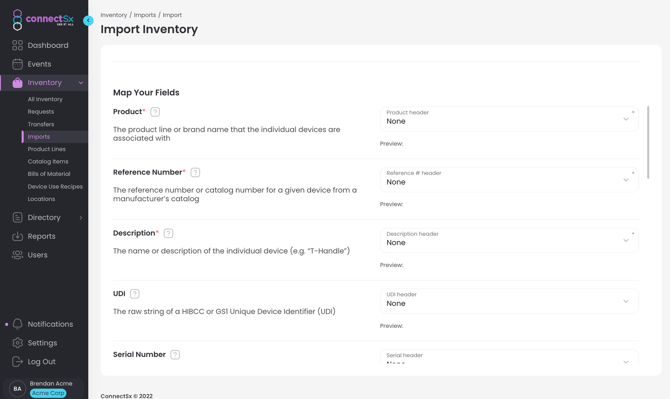
6. Next, map the column names of your spreadsheet to the data fields in ConnectSx by selecting the headers in the drop down menus for each field (See below).
7. For Instance, in our example below the ConnectSx field “Quantity” was mapped to the column for “Quantity on Hand” in our manufacturer’s inventory spreadsheet.
8. Note that each field has a description to help you understand which columns should be mapped to it. There is also an explanation of each field following these instructions.
9. Click “Import” in the lower right corner of the screen - and your inventory will be imported into the platform.
Inventory Field Detail:
Use the following field descriptions to help understand the purpose of each data point and assist in mapping the data fields during inventory import. The fields marked with a red asterisk * are required fields and must be included in your inventory load file in order for it to be uploaded successfully.
Custody
The email address associated with the user account that is currently in possession or has responsibility for that piece of inventory.
UDI
The Unique Device Identifier for a device. This is the GS1 or HIBCC generated UDI associated with a device per FDA regulation. For more information on UDI please visit Unique Device Identification System (UDI System)
Catalog #*
Sometimes referred to as Reference Number, Model Number, or Item Number - this is the internal number used to identify a device for inventory and sales purposes. Devices may share a catalog number, but catalog number must be unique for each container. If the catalog number entered has not been created already in your account, it will be created automatically in the Catalog during import and will adopt the description imported with it.
What product line does this device belong to? Product line will be used in vTrakr to select various devices when sales reps are requesting inventory and for organizing your devices in the catalog.
Description *
The device’s name and any identifying information typically used to describe the device (such as measurements). This should be concise and descriptive in order to help identify the device (Think about how it will be displayed in vTrakr on an iPhone). Other device information and characteristics can be included as Tags to help when searching for a device.
Essentially Tags are search terms. Include specific information that is not included elsewhere or makes sense to break out. These are completely subjective to be used at your discretion to improve the ease of searching for a device.
Your tags should all be included in one column, one cell per row, with each tag being separated by the “|” bar symbol. Please see the example below:
For example: 6.5mm|100mm|Partially Threaded|Cannulated|Titanium|Screw
-
Width: (6.5mm)
-
Length: (100mm)
-
Threading: (Partially Threaded)
-
Cannulation: (Cannulated)
-
Material: (Titanium)
-
Type: (Screw)
Then all of those tags would be searchable and would return that device in the search results. Tags could also be used to assign a temporary note or status to an item, such as if an item was being reworked. I might create a tag that reads “Rework 7-20-19” to reflect its status and when it is expected to be returned. Then I would delete the tag when the device is ready to be considered active inventory again. Another instance would be if I added a tag called “HOLD” for items that were under Quality Control Hold or were being inspected.
Quantity *
How many of a given item and lot are present in a certain user’s inventory?
Is this device in a container or surgical tray? You may enter the identifying number of that container in this field and the device will be associated with that container. The containers listed in this column are automatically created when inventory is imported, so there is no need to include them as discrete line items in your inventory import. If the container is already created, insert the unique Catalog # of that container in this field/column.
Billable
Is this device intended to be sold? Enter “Yes” or “No”. If a price is entered for a device this field will default to “Yes”. Items marked billable are automatically considered “single use”, which means that when they are used in a case, they will be decremented from your inventory.
Price
This is the base sales price for a device. The price is able to be edited on an ad-hoc basis when reviewing the Device Usage Ticket to accommodate for assorted pricing agreements and discounts.
Lot
If your item has a lot number used to identify the batch the device was produced in.
Barcode
This is the text string of what is contained in the barcode, exactly as any barcode scanner would read it. Please note that the barcode field is not intended to hold the UDI - if it does it must be in the human readable format.
Serial Number
If your devices are serialized with unique numbers for each device, you may enter the serial number in this field.
You can load expiration dates for your perishable inventory and the system will notify you as the expiration dates approach. Make sure to load your expiration dates in the MM/DD/YYYY or MM-DD-YYYY.
This is the Cost of Goods and can be entered by each individual line item in your load file. The Cost of Goods does not need to tie up to the Catalog level, each individual device may have its own Cost of Goods.
This is the geographic location of your inventory and is useful for tracking where your inventory is, beyond the inventory’s custodian. Transfers still anchor on Custody, although you may reset the location during a transfer. Make sure your locations in your import match the locations in your account exactly.
Inventory Type
This is a new datapoint tracking the inventory type. Select from Implant, Instrument, Biologic, or Other. Check your spelling!
Date of Manufacture/Acquisition
Include the manufacture date of your inventory in order to utilize the FIFO and LIFO automatic stocking features of Bills of Materials and to track the age of your products.
Inventory Upload Tips
-
Audit Your Inventory: Although not required, we suggest doing a full inventory audit before uploading your inventory into ConnectSx to have as-close-to-perfect data as possible.
-
Tags: Think strategically about the Tags you are including so they will help you narrow your search. Currently the description is not searchable in basic search, so consider creating tags for things such as item name, product sizes, item types, etc.
-
Check your Data with Auto-Filters: It can also be helpful to add Auto-filters to your columns so you can look at the drop down menus and easily browse through to see if there is any data that includes a typo. For instance if you included “Length” as a Tag, and you meant to type “100mm”, but the data accidentally reads “10mm” or “100mm”.
-
Standardized Data: It can be difficult to make wholesale changes to large groups of items in ConnectSx, so it is important to maintain consistent data and naming conventions for inventory that will be loaded/removed/reloaded over time. Consistency will help to keep the inventory data from being messy and incongruous. Certain process decisions can help with this – always copying from a standardized SKIF or load file for loaner trays, for instance, and reviewing a load file vs. existing system data for consistency can help reduce the likelihood that data is entered differently than a prior load. Some good things to check for include:
-
Matching same product line name over time
-
Matching same description over time
-
Item Numbers (Dashes, and spaces)
-
Tags
-
Typos
-
Uniform descriptions
-
-
No Decimals: Make sure the quantity column does not include any decimal points.
-
Check Custody: Make sure all of the custody accounts you are including have been created in ConnectSx, or the load file will error out. Ensuring the spelling of email addresses in the custody field will ensure the file does not error out. Email addresses must match what is stored in each user account, copying the email address from the “Users” section of the Console can help to ensure spelling is correct.
-
Update all formatting to “General”. Select all data in the file, right click and select Formatting. Select General under the number format and apply the change to the document.
-
Paste as Values: It’s a good idea to copy all of your data, then paste it as a value to remove any remaining equations or references that could be thrown off during the upload.
-
Do this by copying the selected data
-
Right click and select “Paste Special”
-
Select “Values”
-
Click Ok
-
-
Save as .CSV: The Excel load file must be saved as a .CSV in order to be uploaded.
-
Avoid Duplicating Inventory: Each new import will ADD-ON to your existing inventory data, so any items you are loading as an update should be deactivated in the console prior to upload to avoid duplication of inventory data.
Reviewing the Inventory and Deleting Imports
It is critical following a successful import to review the inventory data you just created to validate there are no errors or issues in the data that need to be addressed. For instance, what if the lot number field was mapped to the catalog number column? You’d have a lot of inventory with incorrect lot numbers!
ConnectSx allows you to delete an import in instances such as these AS LONG AS:
-
The inventory data has not been changed, moved, or modified in any way since import.
-
No more than 48hrs has passed since import.
To learn more about deleting an import, check out this article.