After you've created the event for your Case, the next step is to record the inventory that is used in the case, or in other words mark the inventory as used.
Recording Sales in Beacon Mobile
Making Adjustments to the Sales Order
Adding Non-Inventory Charges in Beacon
Next Step: Generating the Sales Order
Recording Sales in Beacon Mobile
-
Navigate to the Events Screen
-
Find the Event you are looking for, and click on it to enter the Event Detail Screen.
-
To record device use during or after an Event click on the Ellipse button in the lower right to bring up an options menu.

-
Next select Mark Used Inventory

-
Locate the inventory you need to mark in the case using the search and filter options in the Mark Used screen.
-
Click on the arrow to the right of the Filter heading to expose the inventory search filters.
-
Click on the magnifying glass in the search field to populate search results.

-
- Utilize the inventory search filters to find the inventory you're looking for:
- Filter for inventory in a specific container
- Filter by Expiration
- Only show devices on the Quote for that case
- Select specific quoted catalog #'s
- Only show billable inventory
- Filter by device Manufacturer
- Filter by custom location
- Show facility stock items only (if using Facility Stock)

- When you’re done selecting items, click “Next”.
- Review the items you’ve selected for accuracy and use the +/- buttons to modify the quantity of each item that was used.
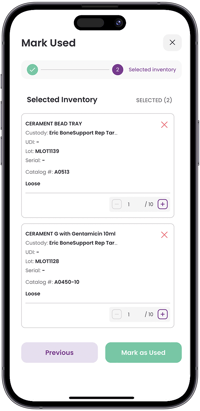
- When you are done marking device statuses click “Mark as Used” to add the items to the Devices Used section of the Event
- Modify an item’s usage status, price, etc. in the Devices Used tab by clicking on the pencil icon to edit the item.
- Items will automatically be given the status of “Used" by default.
- Contract Pricing will populate automatically if loaded into the directory. If a contract price is missing you will see this symbol:

- You may add additional non-inventory line item charges in the "Additional Cost or Adjustment" section at the bottom.

Note: If an item is marked implanted, damaged, and explanted it cannot be marked as reusable and will be decremented from your inventory at the closing of the Event.
NOTE: If cell or internet service is not available consider using Offline Mode to download the Event Data before going into the case while you still have a connection. The ultimate plan B in the event of unforeseen circumstances is to use paper to record device use, and input the data into one of the applications at a later time. Consider using our AI enabled label/bill sheet upload to record used inventory.
Recording Sales in the Console
Cases can be created on the web using the Console as well:
-
Navigate to the Events screen
-
Locate the Case you need to mark devices as used for. Click on the case name to view the event detail page.
-
Click "Mark Used" in the upper right corner of the screen.

-
Then search for the relevant inventory using the filters in the Mark Used pop-up screen.
- Upload Used (AI feature)
- Scan to Add
- Add New
- Search by product info (Also scan barcode)
- Search by container (Also scan barcode)
- Expiration
- Filter by quoted devices or select quoted catalog #'s
- Filter by billable inventory
- Filter by Manufacturer
- Filter by Facility Stock items

- To view inventory shared by a distributor make sure to change the custody filter to include these results. Inventory shared by a distributor will display its custody in red text.

- You may filter your inventory according to which container it is located in by selecting the Container Catalog # on the left in the filters section.

- As you locate the inventory to mark as used, click on each device "card" or click the "select" button to add them to the Selected tab.

- To view the items you have selected, click on the "Selected" tab, where you may also deselect an item or modify the quantity selected of each item.

-
When you've completed your inventory selections, click "Next"
- Review the items selected and make any necessary adjustments, then click "Mark as Used" to add the inventory to the case.
- NOTE: You cannot add more than 1,500 items to an Event, in order to prevent timeout issues.

- NOTE: You cannot add more than 1,500 items to an Event, in order to prevent timeout issues.
Making Adjustments to the Sales Order
- Click on the “Devices Used” tab to see the inventory you’ve added to the Event
- Click on the arrow of each row to expand the catalog # section and view each individual device.

- Contract pricing will automatically populate if it has been loaded into the Directory. If no contract price is found for a catalog # and facility, the yellow warning symbol will display.
- To make modifications to an item's price, usage status, single use status, or no-charge the item, click on the pencil icon on that row.

- Make any adjustments needed and click Save.
- Note: The allowed adjustments to used items may be limited by organization settings. If you have questions about your organization settings or allowed item modifications, follow up with your organization admin.
- Note: If a device is marked as “Damaged” a sales user will be able to modify its price, regardless of contract price being present. Otherwise, contract pricing cannot be edited by sales or distributor users.

- Click on the ellipses button along the right side of an unexpanded row to bulk modify details for all of the devices under that line at once.

- You may also now mark all items in a case as “No-Charge” using the No-Charge switch at the top of the window by the filter section.

Adding Non-Inventory Charges in Beacon
In some cases it may be necessary or advantageous to add items, charges, fees, discounts, etc. to a sales order that are not technically inventory items.
-
Navigate to the OPEN event you would like to add the non-inventory line-item to, click on the Even Name to open the Event Detail Screen.
-
Click on the Devices Used tab of the Event Detail Screen.
-
Next, scroll down the page until you see the “Additional cost or adjustments” section.

-
Then click on the “+” button next to the "Additional Cost or Adjustment" header.
-
Enter a description and price for your adjustment in the fields when prompted (It can even be a negative number).
-
Click “Save” and your adjustment will be added to the sales order!
The next step after recording your sales is to generate the sales order and send it to the facility.