Last updated: June 2024
While the main functionality of the Events Workflow is covered in this collection of articles, there are some other useful Event features worth mentioning:
Reopening an Event
-
You may reopen an Event if details must be changed by clicking “Reopen” in the Event detail screen, but note that the items that were marked as used on the Sales Order will remain inactive unless you change their status to “unused”.
-
It is key to submit the event for billing again after the event has been revised, and bring it back to its original status (Open, Pending PO, Pending Payment, Paid).
-
When reopening an Event you may designate it as a Credit Memo or Credit Rebill, if necessary.
Cancelling an Event
-
To Cancel an event click “Cancel (Delete) Event” in the upper right corner of the event overview screen.
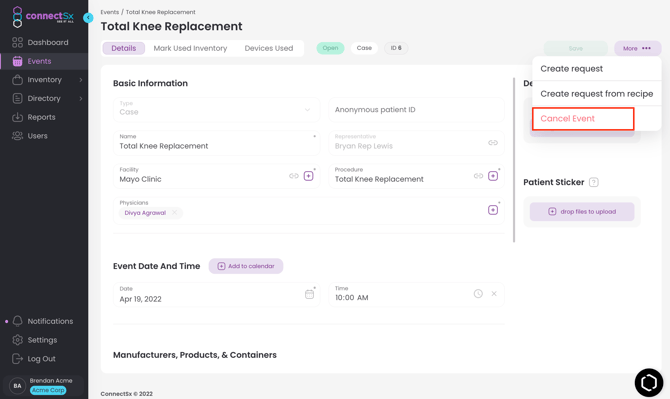
2. The Event status will be updated to “cancelled” and the Event will not be able to be modified any further. The details of the event will be saved in the event record, however, if you need to reference it in the future.
Requesting Replenishment
While you can always request inventory via the normal workflow, we’ve added a special feature to expedite the process. You can automatically request replenishment from the manufacturer for what was used in the case.
-
From the Event detail screen, click on the “More” option in the upper right corner.
-
Click “Request Replenishment”.

-
Select the manufacturer (if there are multiple) that you would like to request replenishment from.
-
Review the products you are requesting. If you’d like to add other items to this request click “Request Additional Inventory.
-Jun-05-2024-07-45-46-6717-PM.webp?width=670&height=396&name=image%20(18)-Jun-05-2024-07-45-46-6717-PM.webp)
-
Make any necessary modifications to:
-
Need by date
-
Mark the request for Saturday delivery
-
Ship to Address
-
Manufacturer Email
-
Request Notes
-
-
Click Create and the request will be sent.
Add Event to Phone Calendar
If you prefer to keep track of your events outside of ConnectSx we’ve created a shortcut to save you some steps.
-
First create your event in vTrakr as you would normally.
-
Then in the Event Detail screen, scroll down until you see the “Add to Calendar” button.

-
Then select the appropriate calendar on your iPhone once the list pops up.
-
Click “Done” and you will receive a message telling you that adding the Event to your calendar was a success.