To manage the detail of your inventory items, navigate to the All Inventory page and use the filters to locate the items you want to manage. Click on a piece of inventory to open its detail screen.
UDI: Unique Device Identifiers
New Updates:
Inventory Type
Two new inventory types have been added:
- Sterile Implant
- Sterile Instrument
Deactivated On
Inventory detail screens will now display a timestamp when an item is deactivated and the user who deactivated it. This will apply to all inventory deactivated on or after when the feature is released. 
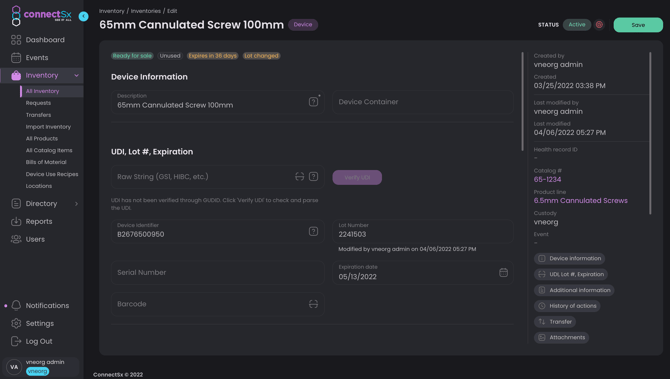
Inventory Details
Click on a device to view the device’s detail screen. Here you can view and edit some of the data that you entered when your inventory was uploaded:
Make sure to save the Inventory Detail Screen whenever you modify inventory details!!!
Make sure to save the Inventory Detail Screen whenever you modify inventory details!!!
View Only Fields:
Some fields are not editable in order to maintain the accuracy of your data. If a device’s name or description needs to be changed then the device should be deactivated and reimported to your account as a fresh item.
-
Catalog Number: Sometimes referred to as the item number, reference number, or product number; this is how an item is primarily identified. Catalog numbers belong to product lines and there may be many items in your inventory that share one catalog number, but are further stratified by lot number and other device information. Catalog number can often be the easiest or best way to search for inventory.
Catalog #'s may be changed by Admins at the Catalog level only. Changing a catalog # in the Product Catalog will change it for all inventory with that catalog # assigned.
-
Manufacturer: This is the manufacturer who is selling the inventory. If your organization’s logo and contact information should appear on a sales order for an item, then it should be created with your Organization as the manufacturer. The sales order will display whichever company is entered as a device’s manufacturer.
-
Custody: Impact the custody by transferring the inventory
-
Created by details: When was the device created and by who?
-
Last Updated details: When was the device updated last and by who?
-
History of Movement: this shows how and when device movement was logged, such as stages of shipping or sterilization.
-
Transfers: This shows previous transfers a device has been implicated in. You’ll also find the link to click to initiate a transfer including that device. An item may not be transferred if it is assigned to a container.
-
Event: Has this item been used in or sold in an event? That will be listed here. You may click "Mark in Event" to add an item to an event.
-
Product Line: The brand name or overall “product” a catalog number belongs to. This may only be changed at the Catalog level.
- Deactivated On: A timestamp will be added when an item is deactivated and by who. This will apply to all deactivated inventory following July 4, 2024 when the feature is released.

Editable Fields:
-
Device Description: The device description is set when inventory is created, either by Import or Manual creation. If created manually, the device description will populate from the Catalog as long as the description has been entered in the Catalog. The device description is editable in this screen by Admins.
-
Container: this is the container that a device is assigned to. You can clear this field out to release an item from a container, or to assign the device to a container start typing in the field to select from the available containers in that user’s custody. The devices can also be added to a container in the respective container detail screen.
-
Inventory Type: The new inventory type field allows you to designate your inventory as either Implant, Instrument, Biologic, Sterile Implant, Sterile Instrument, or Other.
-
Tags: Tags are user-defined search terms. Use tags to add statuses, searchable notes, or any information you’d like to also use to search for inventory. Create tags by typing into the Tags field and hitting enter, make sure to Save the screen when finished.
-
Billable status: If an item is marked billable it will charged for on sales orders when used in an Event. Unbillable items will not be charged for when used in an Event.
-
Price: This is the list price for a device which will populate on the sales order unless a Facility Contract Price is loaded for that Facility and Catalog #, or if the price is modified in the Event workflow.
-
Reusable Status: If an item is marked reusable it will be returned to the custodian’s inventory after an Event is closed. If a device is marked single-use it will be consumed and decremented from the custodian’s inventory when an Event is closed.
-
NOTE: When a device’s reusable toggle is turned on, its reusable status will become locked. The device will no longer be able to be transformed into a single-use device. Be sure before marking any device reusable.
-
-
UDI*: See more information in the UDI section below. Note the lot, device identifier, serial number, and expiration date fields may not be available to edit if they are being populated from the UDI.
-
Device Identifier: The device identifier is part of the UDI
-
Lot Number: This is the lot # for the device, typically assigned to a given batch of product. If a UDI has been entered with a lot number included, the UDI will be parsed and the lot number will be populated automatically. So if you are importing data with a UDI that includes a lot number, you should not map a separate lot number column.
-
Serial Number: The serial number is a specific, unique identifier assigned to a discrete unit of an item. If a UDI has been entered with a serial number included, the UDI will be parsed and the serial number will be populated automatically. So if you are importing data with a UDI that includes a serial number, you should not map a separate serial number column.
-
Expiration Date: This is the expiration date of an item after which it should no longer be used, such as a biologic or sterile-packed item. As an item approaches its expiration date a status bubble will display showing how many days are left until expiration. Notifications will also trigger as a device nears its expiration date. If a UDI has been entered with an expiration date included, the UDI will be parsed and the expiration date will be populated automatically. So if you are importing data with a UDI that includes an expiration date, you should not map a separate expiration date column. If you are loading an expiration date column, the date should be loaded with a MM/DD/YYYY or MM-DD-YYYY format.
-
Barcode: This is a secondary barcode field (other than UDI), the barcode text string entered here will allow this barcode to be scanned when searching for inventory. This field is not required to be a UDI barcode.
-
Reusable status: is this item single-use or reusable? Reusable inventory will be returned to the custodian’s inventory after a case has been submitted for billing.
-
NOTE: When a device’s reusable toggle is turned on, its reusable status will become locked. The device will no longer be able to be transformed into a single-use device. Be sure before marking any device reusable.
-
-
Due Back Date: This is a due date that can be set for a device or container to be returned from the field. Set the due date after an item is transferred. The due date is cleared after an item is transferred.
-
Location: This field can be used to track geographically where an item is located or stored. An item must still have a custodian to represent who is responsible for the inventory, so this is further detail of where an item is. Locations can be created in a popup in this screen, but can be managed in the Locations section of the console. You may assign locations on import, but the locations should be created in the Location section first.
-
Consignment Status: The consignment status lets you track if an item is possessed by the custodian, consigned to a location, loaned out, or other.
-
Hold Status: Assign hold statuses such as quarantine, ready for sale, inspection, receiving, or rejected/damaged.
-
Manufacture Date: When was the inventory created physically? This will be used to determine FIFO and LIFO when stocking a container using a Bill of Materials.
-
Images: Here you can load images pertaining to a specific device or container.
-
Technique Guide/IFU: Populated from the Product Catalog, these are collaterals that correspond to the device such as sales collaterals, surgical technique guides, or instructions for use. These can be added in the console so they will be available for users in the field when using or selling inventory.
-
Notes: Add notes about the device or what has happened to it.
-
Bill of Materials (Containers only): You may assign a bill of materials to a container to track what items and quantities should be included in the given container. These can be created and managed in the recipes-->bill of materials section of the console.
-
Cost of goods: What is the cost of this particular item?
-
Inspection History: You may mark an item as requiring inspection, the frequency of inspections, then record as inspections occur.
Initiate Transfer
You can also initiate a transfer of the device you are viewing by clicking “Initiate Transfer”. See the section on Transferring Devices for more information. Note that if a device is in a container the whole container will need to be transferred, or the device will need to be removed from the container.
*UDI (Unique Device Identifiers)
ConnectSx stores the Unique Device Identifier (UDI) and can carry it through to the Device Usage, Patient Record, and InvoiceTicket. The UDI can be entered in the Console by going to the device detail screen and entering it in the “Raw String” field under the UDI heading. You may also enter the barcode version of the UDI, which is the full text of the barcode as a barcode scanner would read it. The UDI is then verified against the FDA GUDID Database. If UDI validation fails ConnectSx will issue an error and prompt you to reconfirm your source data.
For more information on UDI please visit Unique Device Identification System (UDI System)
Marking Inventory as Used
You can now mark inventory as used in an event from the device detail screen.
-
Navigate to the Inventory → All Inventory page
-
Search and Filter to locate the inventory you’d like to mark as used
-
Click to open its detail screen
-
Click the “Mark in Event” button in the upper right corner

-
Select the Event from the list
-
Select the appropriate usage status
-
Click “Mark”
-
You will then be brought to the Event Detail screen where you can make more adjustments as necessary
Container Sections
The detail screen of a Container will have some additional sections displayed where you can view its contents and manage what devices are a part of that container.
- Bill of Materials section: If a bill of materials is assigned to this container the BOM section will be displayed showing if the container is fully stocked according to that BOM.

- Devices section: If this container has devices assigned to it they will be displayed here.
- Click on a device to access its device detail screen.
- You may use the buttons in this section to add or remove inventory from the container.